Peer-to-peer (P2P) payment platforms have gained immense popularity worldwide, becoming the financial tools millions of people turn to. Among these platforms, Zelle has emerged as a pioneer, revolutionizing how we transfer money and simplifying the exchange process between friends, family, and acquaintances.
Zelle and other widely used platforms such as CashApp and PayPal are transforming the landscape of personal finance management. Whether you are a seasoned Zelle user or a new user of this extraordinary financial tool, you must be aware of the different features the app offers. In this case, we will focus on how to see Zelle history Chase.
What is Zelle and how does it work?
Zelle is a secure payment service that allows users to send and receive money directly between their bank accounts. It is a convenient way to transfer funds to friends, family, and trusted individuals, regardless of their bank. Users must register with their email address or U.S. mobile phone number to use Zelle. Then, they must link a Visa or Mastercard debit card associated with a U.S. bank account.

Sending, requesting, or receiving money is as simple as providing the recipient’s email address or mobile number, specifying the amount, and adding a memo if needed. Zelle is widely available through various banks and credit unions and is accessible via mobile banking apps.
NOTE: Payments made through Zelle cannot be reversed.
How to send money from Zelle to Chase?
If you want to transfer money from your Zelle account to your Chase bank account, you can easily do so by following these steps:
- First, ensure you have linked your Zelle account to your Chase bank account . You can register with Zelle by visiting the Chase mobile banking app or website and following the prompts to create an account.
- Once you have created an account, open the Zelle app or access it through the Chase mobile banking app. Select the option to send money, pay, or transfer with Zelle.
- Next, enter the recipient’s email address or U.S. mobile phone number.
- After that, specify the amount you want to send and, if you wish, add a note to accompany the payment.
- Before sending the payment, make sure to review all the transaction details. Then, confirm the payment and authorize the transfer.
- Once the payment is sent, the recipient, who must also be enrolled in Zelle, will receive the funds directly into their Chase bank account.
REMEMBER: Ensure to follow the prompts in the app or website to smooth and successfully transfer funds.
Why is it so essential to track Zelle’s transactions?
Regularly monitoring your Zelle transactions is crucial for safeguarding your finances and detecting unauthorized or fraudulent activity. By staying vigilant and reviewing your transaction history, you can quickly identify any irregularities and take immediate action to protect your hard-earned money.
Cybercriminals constantly evolve, so staying proactive in detecting and preventing potential breaches is essential. Zelle transaction tracking helps maintain your funds’ security and provides a detailed record of your financial activity, aiding in budgeting, tracking spending patterns, and achieving your financial goals.
Additionally, it ensures the accuracy of payments, especially when splitting bills with friends or family, promoting transparency and trust in your financial relationships.
How to find Zelle transaction history in Chase?
While accessing your Zelle transaction history in the Chase app is relatively straightforward, you may wonder why it is necessary to do so. One common scenario where checking your Zelle transaction history becomes crucial is when you are unsure if a payment has been debited from your account.
For instance, if you paid through Zelle to a Chase account at a store, but the funds have not been deposited, it is essential to investigate the situation and determine if the transfer was completed successfully. Reviewing your Zelle transaction history, you can verify the payment status and take appropriate action if necessary. Now, let’s see how to see transaction history from Zelle in Chase.
- Open up the Chase app.
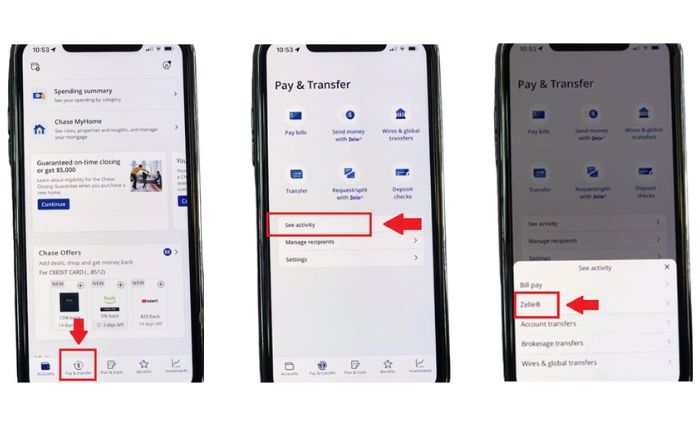
- To view your Zelle Chase transaction history, click on the “pay and transfer” on the main screen at the bottom, as shown in the image above (you will distinguish it because it has a small dollar sign above the “pay and transfer”).
- After clicking there, you will see several options, such as “Pay bills,” “Send money,“ “Wires and global transfers,” etc. To view your Zelle transaction history, go to the options below and click on “See activity.”

- Next, you will see a box under “See activity,” where you can see several options to view your account. In this case, access your Zelle transaction history by clicking on the “Zelle” option.
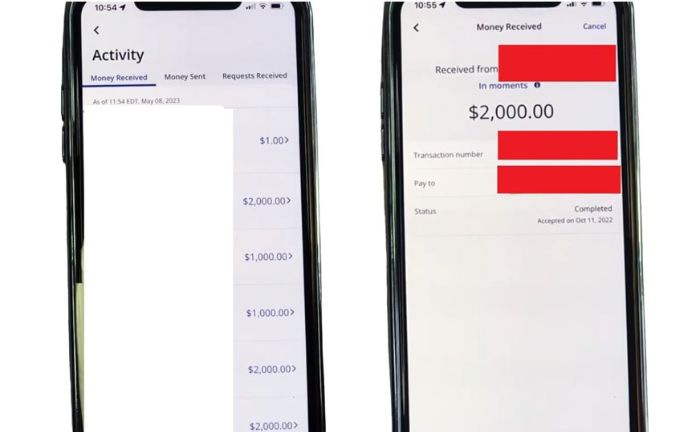
- You will then view your most recent transactions, whether you sent or received money. The people you have sent or received money from will be shown on the left side of the screen. On the right side, you will see the amount for each transaction. This is how you can view your Zelle Chase transaction history.
- In addition to “money received,” you can enter “money sent” and “requests received.”
Finally, if you click on the corresponding transaction number, you will be redirected to a new screen where you can see all the details and more information about the transaction. This screen will show you who the money was sent or received, the Zelle transaction number, and the Zelle transaction status.

What If I Send the Wrong Amount or to the Wrong Person?
When using Zelle, it’s important to note that there is no safety net if you accidentally send the wrong amount of money to the wrong person. Once a Zelle transaction is completed, it is considered final, and Chase cannot reverse Zelle transfers.
However, if the recipient has not yet claimed the funds, there may be an opportunity to initiate another payment with the correct amount or to the intended recipient. Always verify the recipient’s information before starting any transaction through Zelle to avoid costly mistakes.
2024 Changes in transfers between Zelle Chase
Starting December 9, 2024, Chase customers will no longer be able to use the standalone Zelle app and must use Zelle within the Chase Mobile app or chase.com. There will be no fees for using Zelle with Chase, and all contacts and payment history will be transferred.
Users must use Zelle in the Chase Mobile app or chase.com to continue using the service. Pending payments will not be affected. The Zelle app will only be available to users whose banks do not offer Zelle directly.
FAQs
What should I do to use Zelle after the changes in the app?
To ensure that you can continue using Zelle, you only need to start using Zelle within your Chase Mobile app or on chase.com. Just log in and select the “Send money with Zelle“ option in the side menu of the mobile app. If you prefer thase.com, you can access Zelle by selecting “Pay bills and send money with Zelle” in the Pay & transfer menu.
Can I see my Zelle transactions for an entire year?
Yes. Zelle transactions can be viewed for the last four months, but downloading them is only possible month-by-month. This limitation is in place to ensure the security and privacy of your financial information. Downloading transactions every month helps prevent unauthorized access or misuse of your data.
Will I lose my payment history when transferring through Chase?
No. Transferring money using Zelle through the Chase app or webpage is seamless and straightforward. Users can be confident that their payment history and contacts will remain intact as the smooth transition ensures uninterrupted transactions.
References
- “Use Zelle® with the Chase Mobile® App or Chase.Com | Zelle.” Zelle® | A Fast and Easy Way to Send and Receive money, https://www.zellepay.com/faq/chase.
- “Zelle® | Chase.” Credit Card, Mortgage, Banking, Auto | Chase Online | Chase.Com, https://www.chase.com/personal/zelle/receive.
She has a degree in Social Communication (graduated in 2010). Arianna has experience in research and writing about universities, credit cards, procedures and insurance, among other topics related to finance in general.
With more than ten years of experience, she has worked in different local and digital media, writing on various issues related to the economy and international politics. She has also coordinated teams of editors, gaining experience in managing groups.
She was born in Merida, Venezuela. She lived in Wausau, Wisconsin, for 5 years, allowing her to learn English. Being bilingual, she also does research and writing in Spanish.
She has taken TOEFL exams and English proficiency tests (passed), so she is qualified to write texts in English.


